You can use the VelocityOne Hangar app to update the firmware for your unit and to customize your controls. This app is available here for PCs and Android devices (an iOS app is coming soon). For more information on using the VelocityOne Hangar app to update the firmware for your unit, please click here. We also have a guide to using the VelocityOne Hangar app to customize your controls available for download here.
You can also view the contents of that guide below.
The first part of this guide is dedicated to updating the firmware; we have a separate article available regarding firmware updates for this product available here.
CONFIGS MANAGMENT OVERVIEW (PC)
A config is a specific group of settings that have been assigned/activated that change the appearance or behavior of either the Flightdeck Stick or the Flightdeck Throttle. Configs work on a per module basis -- so changes made on the Flightdeck Stick will not affect the Flightdeck Throttle, and changes made on the Flightdeck Throttle will not affect the Flightdeck Stick. This allows for total customization of both halves of your Flightdeck system!
Please note that Configs MUST be synced to either the Flightdeck Stick or the Flightdeck Throttle in order to be used.
To customize the Configs for the Flightdeck Stick and Throttle modules, please do the following.
-
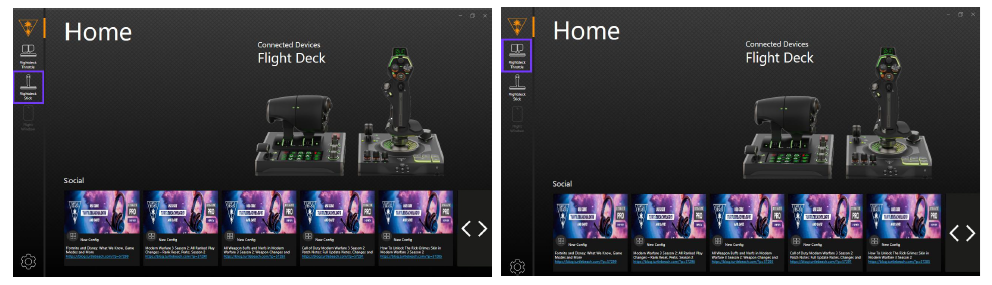
Once the VelocityOne Hangar app has been downloaded, open the app and connect both the Stick and Throttle to separate USB ports on your PC. The VelocityOne Hangar will show the devices that are connected to your system. The left-side column will show two icons, one each for the Flightdeck Stick and Flightdeck Throttle. You can choose either the Stick or the Throttle by clicking on those icons. In the images below, the Stick is the chosen device in the left, and the Throttle is the chosen device on the right.
-
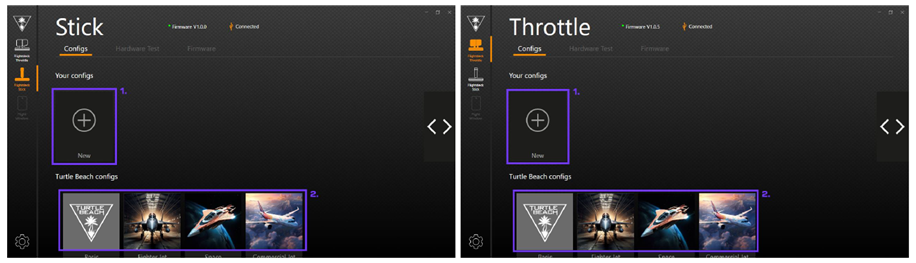
Once you select a module (either the Stick or the Throttle), you will see the Config page. Here, you can create new configs designed for your play style or for plane-specific options. When creating a Config, you can either create a NEW config (Option 1), or copy an existing TB Default config (Option 2). The default configs are Basic, Fighter Jet, Space, and Commercial Jet.
-
After your Config has been created and customized, you'll need to save the Config, and then and then sync that Config to the Stick/Throttle. Once that Config is synced to the unit, you're ready to go!
CREATING A NEW CONFIG (OPTION 1)
Selecting the NEW Config option will open the relevant page for the selected module. (Again, in the images, the Stick is the selected module on the left, and the Throttle is the selected module on the right.)
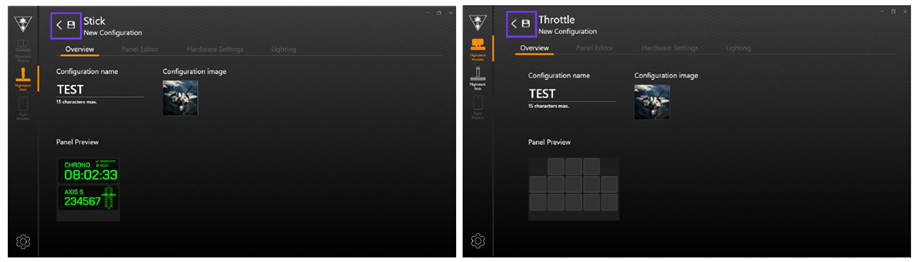
Here, you can name your new Config (in these images, that new name is "TEST"), choose an image for that config, and view a panel preview for the Head-Up Display (when the Stick is selected) or the Flight Touch Display (when the Throttle is selected). Once you have made your changes in this screen, select the Back arrow/Save icon in the top-left of the screen will save your changes and take you back to the previous Configs screen.
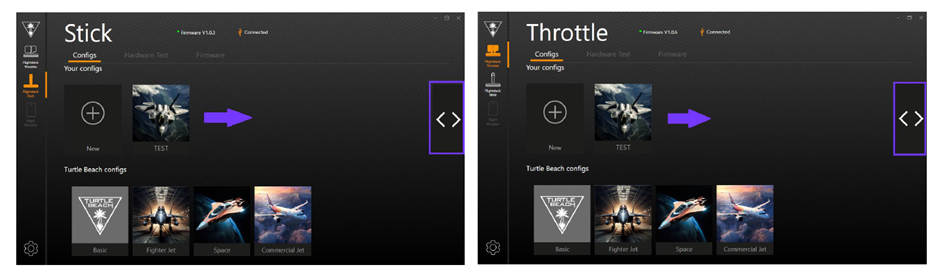
Back in the previous Config screen, you will now see your newly created Config. This will appear to the right of the New Config button. Any newly created or copied configs will appear in this list, and will fill up to the right of the screen. Once you have filled up this list, you can use the arrow buttons on the right-side of the screen to scroll through all of your available configs.
COPYING A DEFAULT CONFIG (OPTION 2)
In the Turtle Beach Configs section, you can highlight one of the default Configs -- Basic, Fighter Jet, Space, or Commercial Jet -- by hovering your mouse cursor over one of the options. Once a default config has been highlighted, the config will enlarge and have an orange outline around it. A Copy button will appear in the bottom right-hand side of the config option. Click on this Copy option to copy the config; it will appear in the list of your created configs.
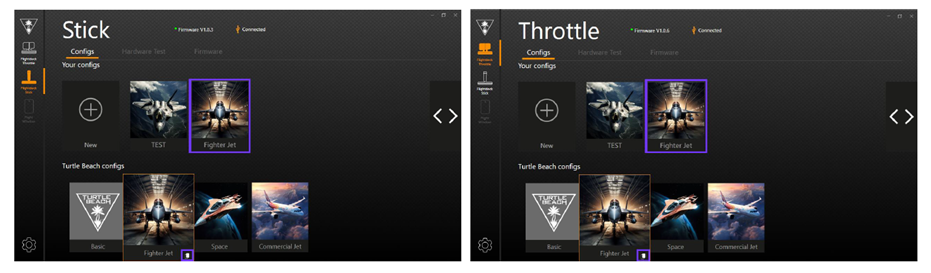
You can copy one of the default Configs, or one of your own created configs.
EDITING/SYNCING CONFIGS
Highlighting any of your configs by hovering your mouse over the config in question will cause the config to enlarge and be outlined in orange. Multiple buttons will appear in the bottom right-hand corner of the highlighted config. From left to right, these buttons are Edit, Copy, and Delete.
To Edit a config, either select the Edit button on the highlighted config, or double-click the config in question.
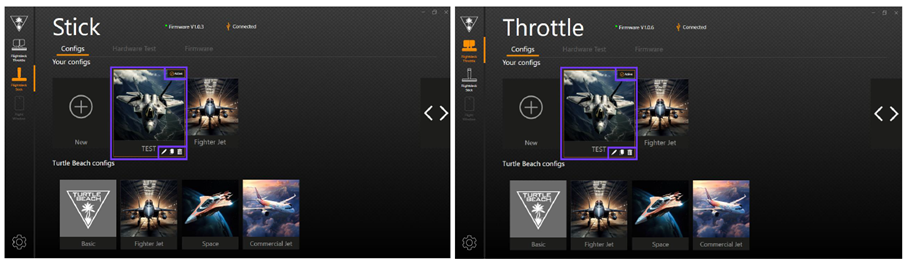
Once you have edited a config to your liking, you will need to Sync that config to the Flightdeck modile. To sync a config to the Stick or Throttle module, first single-click the config in question. The active config will move to the front of the "Your Configs" list (next to the New Config option). The Active config will show an icon that states Active with a tick/checkmark, to confirm it is currently active.
After the single-click on your chosen config, the sync will take place on either the Stick or the Throttle. A vibration will be given off by the module in question when the sync is successful.
When syncing to the Throttle, a message will appear on the Throttle FTD stating "SYNCING PROFILES - Do Not Disconnect"; you will also see a progress bar in the VelocityOne Hangar app, which will also warn you to not disconnect the Flightdeck or reset/power off the PC. These messages will not appear when a config is being synced to the Stick, as the syncing process for the Stick is much quicker.
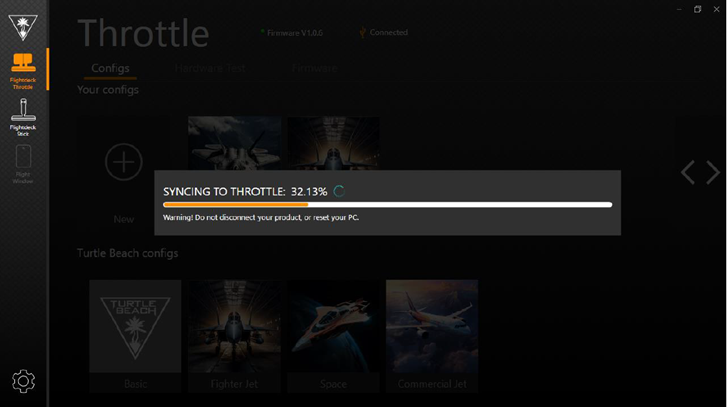
Once the Configs for both the Stick and the Throttle have been synced, you're ready to use your unit with those new Configs.
STICK SETTINGS PAGE
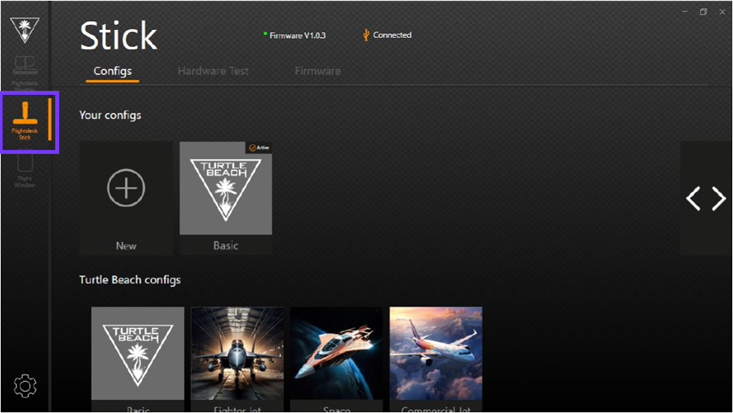
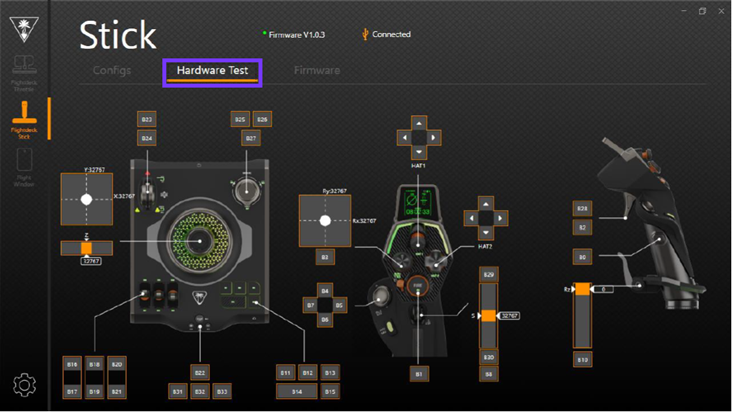
When the Stick is connected, click the icon on the left-hand side to show the options for the stick. You will see the available configs, along with the header bars for Hardware Test and Firmware. Clicking the Firmware tab will take you to the firmware updates page; for more information about firmware updates for this product, please click here. Clicking the Hardware Test tab will take you to a page where you can test each of the inputs on the Stick.
STICK SETTINGS - HARDWARE TEST
Move and press the controls on the device to get real-time feedback -- ideal for ensuring your hardware is working as expected.
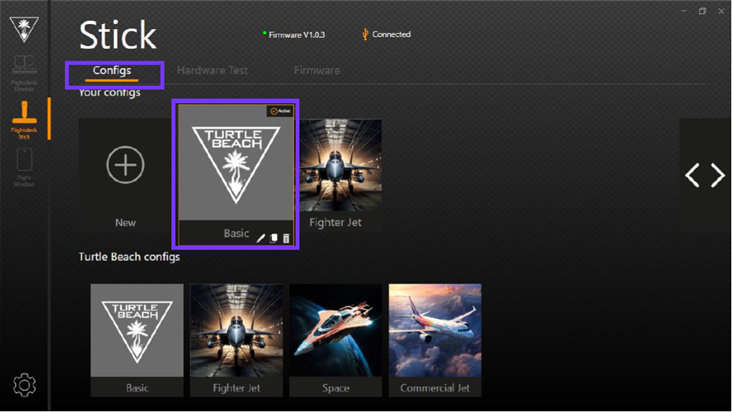
STICK CONFIG OPTIONS
To access your config options, go to the Configs tab, then either double-click the Config tile or single-left click the edit (pen) icon.
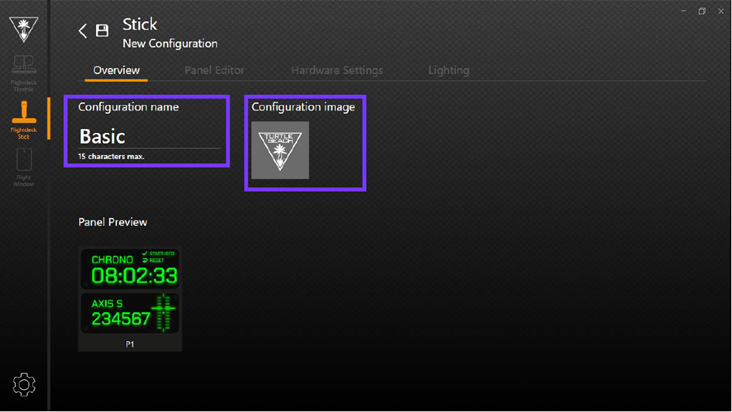
The overview tab enables you to name your config, and select an image for it. To select a config image, click the default image to reveal a gallery of images you can choose from.
The Panel Editor Tab allows you to alter the look and feel of the HUD home screen. The text box at the bottom-left can be used to name the Panel. On the right-side, the Panel Style options (Combat, Space, or Commercial) can be used to alter the appearance of the Panel, depending on the type of sim you are using. Finally, the Outputs option will allow you to drag and drop different widgets onto the panel itself, to show different outputs from the device.
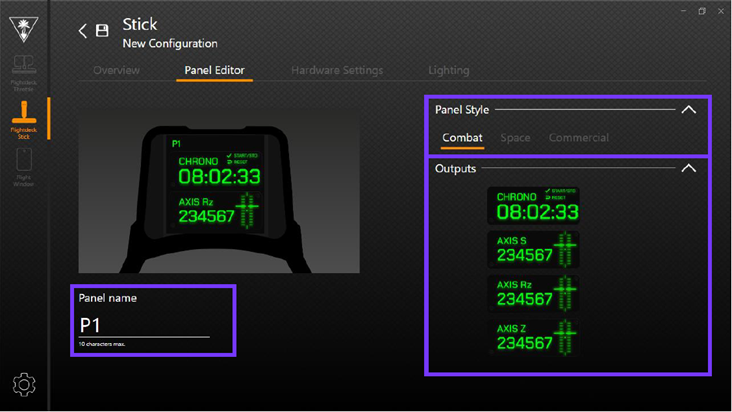
HARDWARE SETTINGS - STICK PERFORMANCE
This page enables customization of the main stick axes. You can:
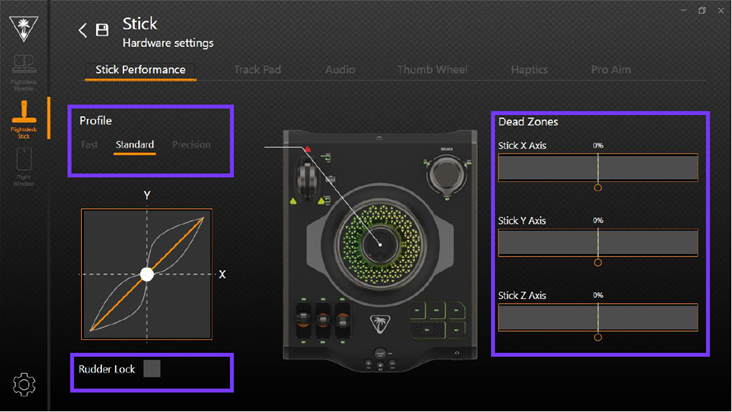
- Change the response profile of the stick between Fast, Linear, and Precision.
- Each profile is designed for a specific situation -- Standard offers unaltered input data for true 1:1 control; Precision allows you to make fine adjustments with larger movements, which is ideal for tense landings; Fast allows for quick, snappy movement, which is ideal for arcade-style control.
- Enable rudder lock to remove any input from the stick twist controls
- Helpful for situations where you are using separate Rudder pedals in your setup.
- Adjust firmware dead zones for the stick X (left/right), Y (forward/back) and Z (twist) inputs.
- Deadzones can be individually set for the X, Y, and Z axis.
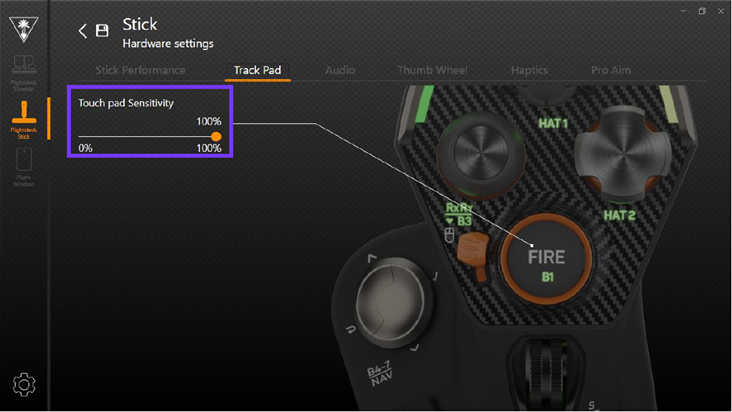
HARDWARE SETTINGS - TOUCHPAD
This page enables you to alter the cursor sensitivity when using the Touchpad. The higher the sensitivity, the faster the cursor will move.
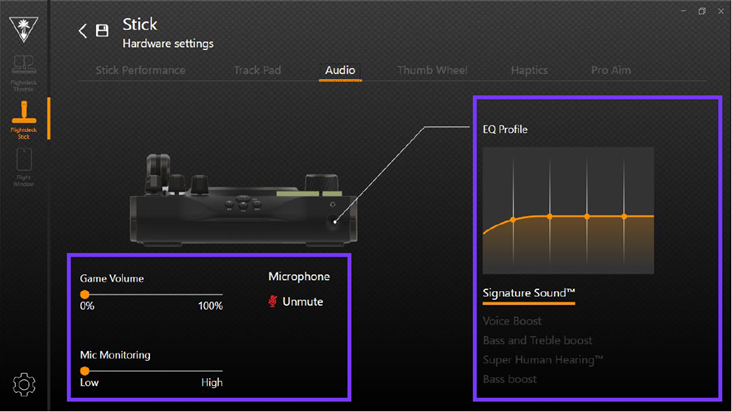
HARDWARE SETTINGS - AUDIO
This page enables you to alter the audio options for any 3.5mm/wired headset connected to the audio port on the front of the base, including Game and Mic Monitor volume control, Mic Muting, and 5 EQ options -- Signature Sound, Voice Boost, Bass and Treble Boost, Superhuman Hearing, and Bass Boost.
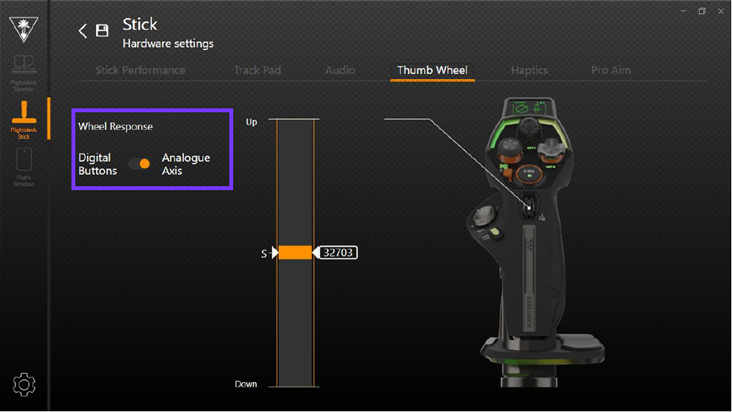
HARDWARE SETTINGS - THUMBWHEEL
This page enables you to alter the input behavior of the stick thumbwheel. You can choose between an analogue axis response (where each click equals a location on a slider), or digital buttons (where each click is equal to a button press).
Some games may not use analogue options for Trim control, for example, so it would be better to use digital buttons for those controls/games. In a space sim, the stick thumbwheel could be used for something like weapons selection -- or other useful digital inputs you might need!
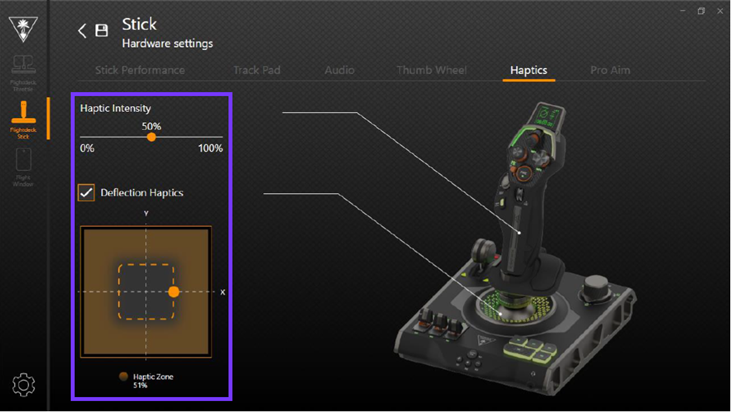
HARDWARE SETTINGS - HAPTICS
This page enables you to alter some of the haptic responses on the stick.
You can set the intensity higher or lower based on your preferences. The Deflection Haptics box must be ticked/checked.
Click and drag the orange dot to set your Haptic Zone. When you move the stick outside of this designated Zone, the haptic motors will vibrate.
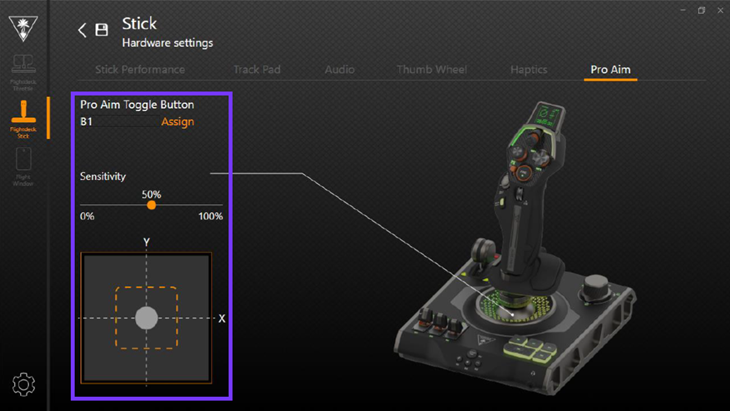
HARDWARE SETTINGS - PRO AIM
This page enables you to set PRO AIM up on the stick. When the assigned button is pressed, the sensitivity of the stick will be reduced. Please note that if there is a secondary control assigned to that button, both the PRO AIM and that secondary function will be output when that button is pressed.
Click the BX entry (in this image, it is shown as B1) to reveal a dropdown list of available buttons. Then, set the sensitivity level to your desired value. The higher the level, the greater the drop in sensitivity when the assigned button is pressed.
LIGHTING
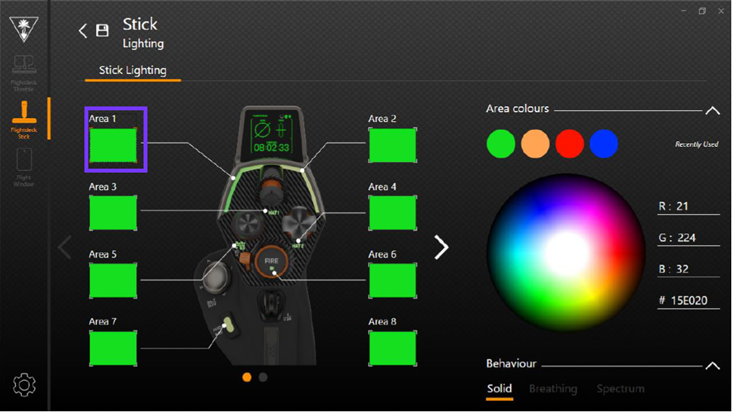
This page enables you to configure the RGB lighting on the stick module.
You can choose from global color combinations, or customize each individual lighting area. The brightness level is global across all lighting zones, even if the color is customized in each individual lighting area.
To customize your lighting zones, first select the Custom option (in the bottom of the "Global Presets" section).
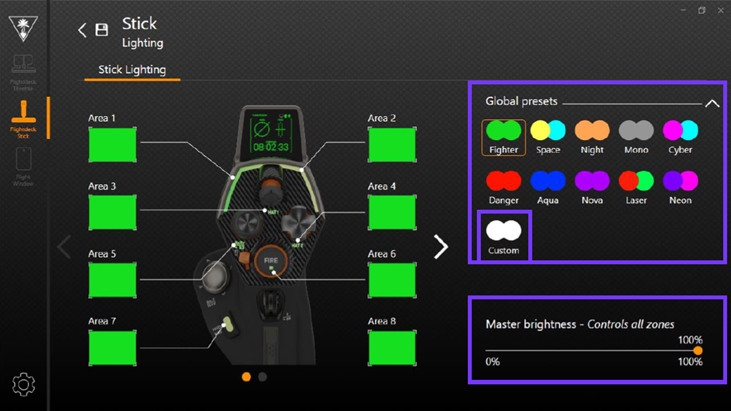
Then, select the area you want to customize, and either choose a color from the swatch on the right-side on the window, or input an RGB figure/value directly. You can also select an effect to be output by the LEDs, in the "Behavior" section just below the Area colors section.
THROTTLE SETTINGS
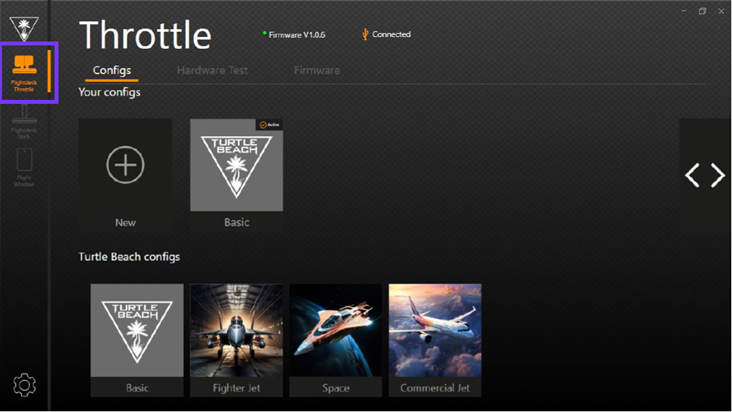
When the Throttle is connected, click the icon in the left-hand size to show the options for the Throttle. You will see your available configs, along with the headset bars for Hardware Test and Firmware. Clicking the Firmware tab will take you to the firmware updates page; for more information about firmware updates for this product, please click here. Clicking the Hardware Test tab will take you to a page to test each of the inputs on the device.
HARDWARE TEST
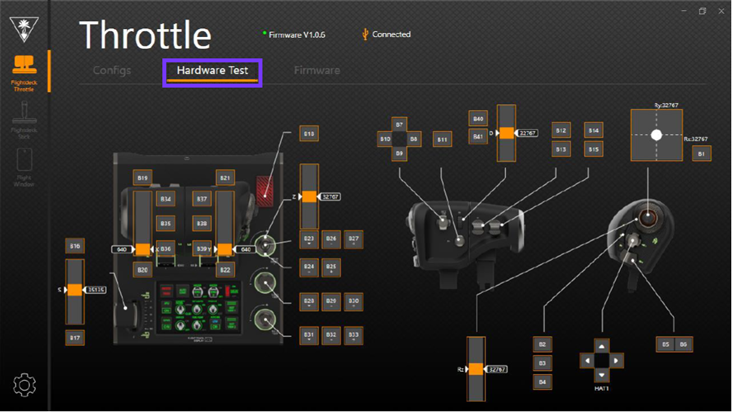
Move and press the controls on the device to get real-time feedback -- this is ideal for ensuring your hardware is working as expected.
CONFIG OPTIONS
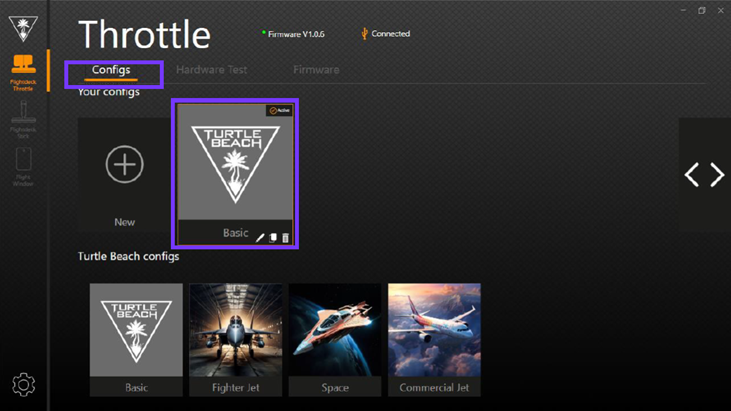
To access your config options, go to the Configs tab, then either double-click the Config tile in question, or single-left click on the edit (pen) icon on the Config tile in question.
CONFIG OVERVIEW
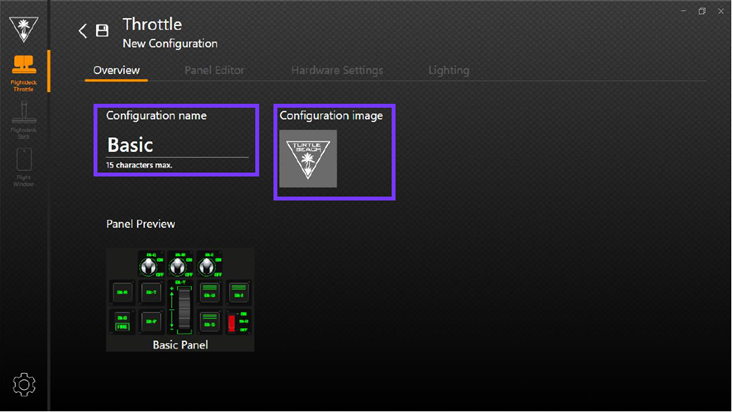
The Overview tab enables you to both name your Config and select an image for that Config. To select a Config image, click the image to reveal a gallery of images to choose from.
PANEL EDITOR
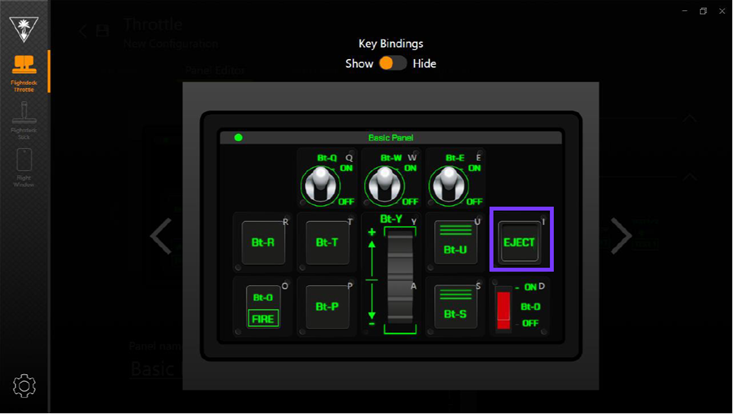
This page enables you to customize the touch buttons on the Flight Touch Display (FTD). When you touch a button on the FTD, a keyboard input will be sent to the PC. Each button cell is a keyboard input; the look and feel of those cells can be customized. The editor pages gives you an overview of what will be sent to the device when you activate your Config.
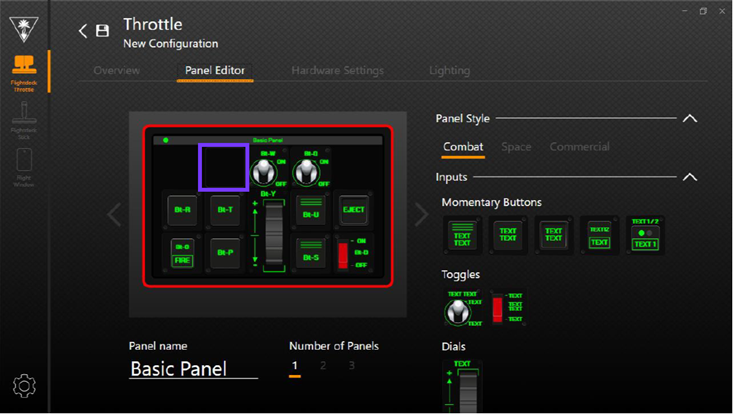
On the Panel Editor page, you can:
- Give the panel a title.
- Decide how many pages of buttons you need in your Config. Each page contains 13 possible inputs.
- Choose a panel style to suit your sim.
- Choose from a variety of input controls. These inputs can be dragged to any of the cells on the panel overview.
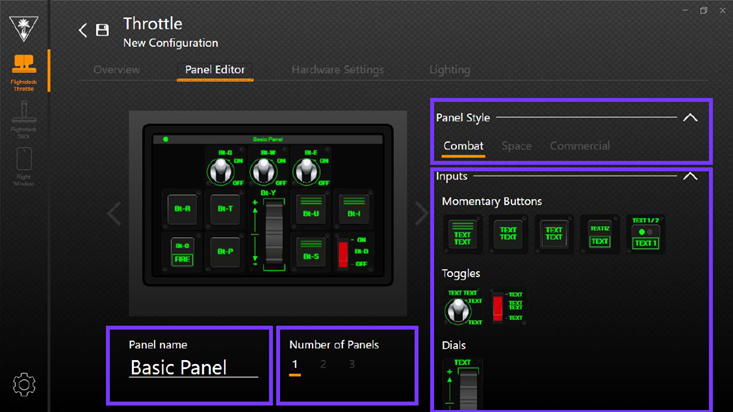
In this example we've dragged a new button type to Panel 1. To edit the button text, simply double left-click the button to bring up the text editor.
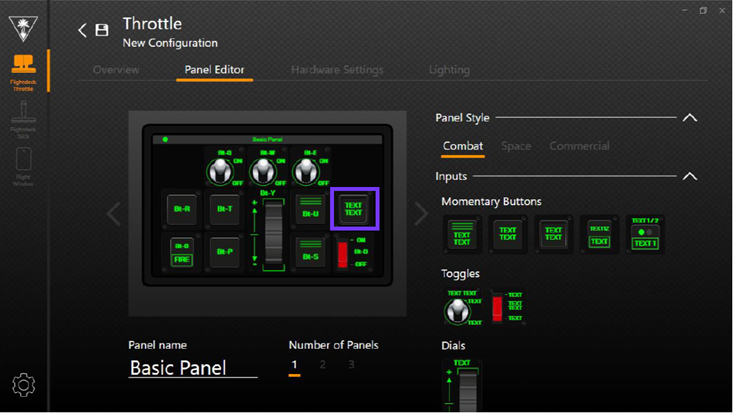
Here you can also see the keyboard inputs that are assigned to each touch button cell. Click inside the button cell to activate the cursor and change your button text.
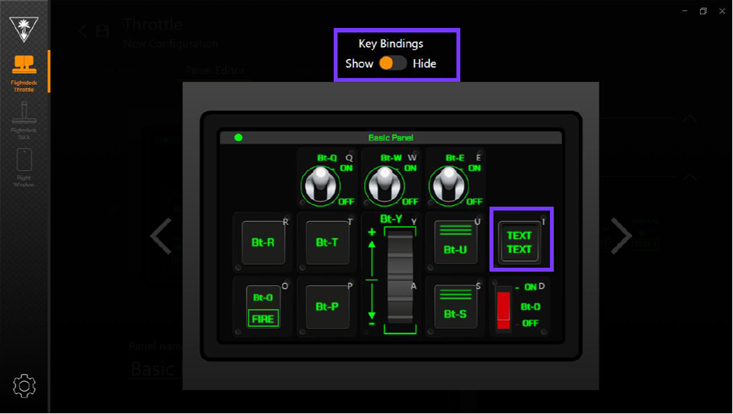
Once you are happy with your text, left-click the black area around the text editor to return to the main panel screen.
To remove a button, simply left-click and then drag the button out of the panel until the boundary of the panel turns red, and then release your mouse click.
HARDWARE SETTINGS - THROTTLE PROFILE
This page enables you to set haptic responses for detent points along the travel of the throttle handles.
This can be used to indicate key thrust levels during flight, or in space sims. For example, many space sims have forwards and reverse thrust set to the throttle axis, with the 50% mark being 0% thrust (no movement). Using this Throttle Profile page, you could set a haptic detent at the 50% mark, so that while you are focusing on the screen, the throttle haptic motor would vibrate so you know you are at the specific throttle level for 0% thrust.
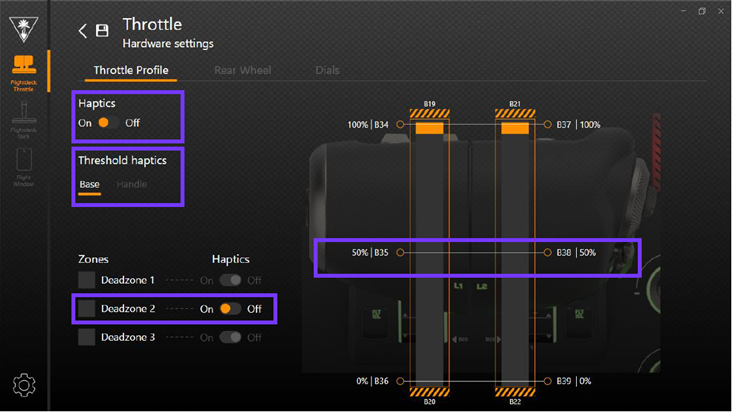
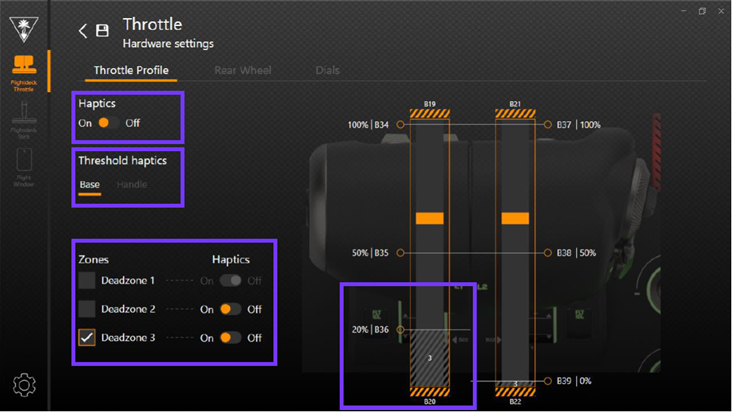
You can:
- Enable or disable haptics.
- Select which haptic motor you wanted to respond (base or handle).
- Enable or disable haptic detent response in up to 3 zones.
- Adjust the size of the haptic detent zone
- This can be done by clicking and dragging the orange circles in the throttle input bar to the desired level.
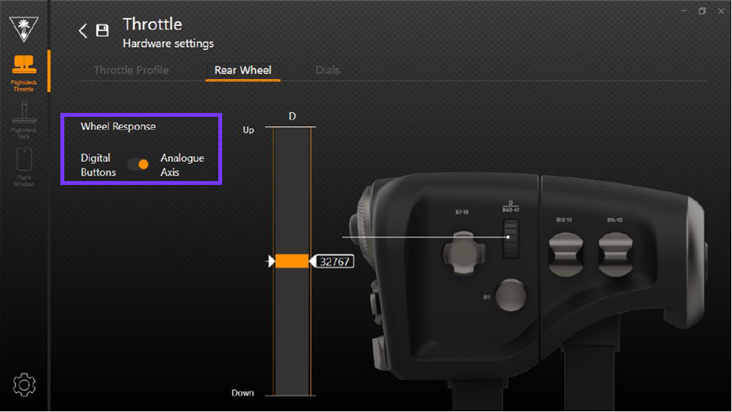
HARDWARE SETTINGS - REAR WHEEL
This page enables you to alter the input behavior of the throttle wheel. Like with the Stick, for the Throttle you can choose between an analogue axis response (where each click equals a location on a slider), or digital buttons (where each click is equal to a button press).
Some games may not use analogue options for Trim control, for example, so it would be better to use digital buttons for those controls/games. In a space sim, the stick thumbwheel could be used for something like weapons selection -- or other useful digital inputs you might need!
HARDWARE SETTINGS - DIALS
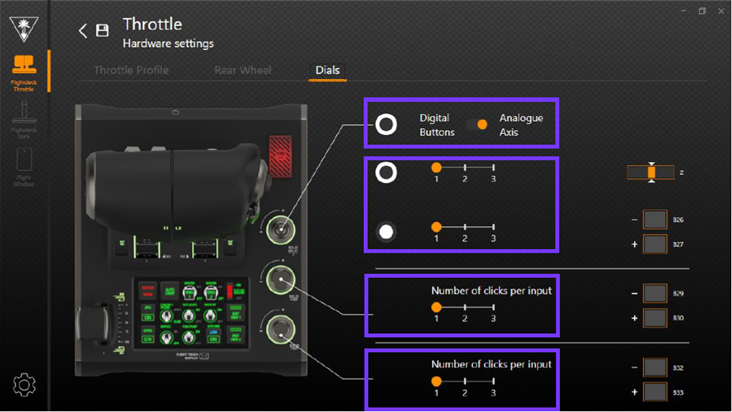
This page enables you to configure how the rotary dials behave.
You can set the outer dial of the upper control to act as an axis or as digital buttons; you can also select how many button inputs will be input with each click of the rotary dial.
LIGHTING
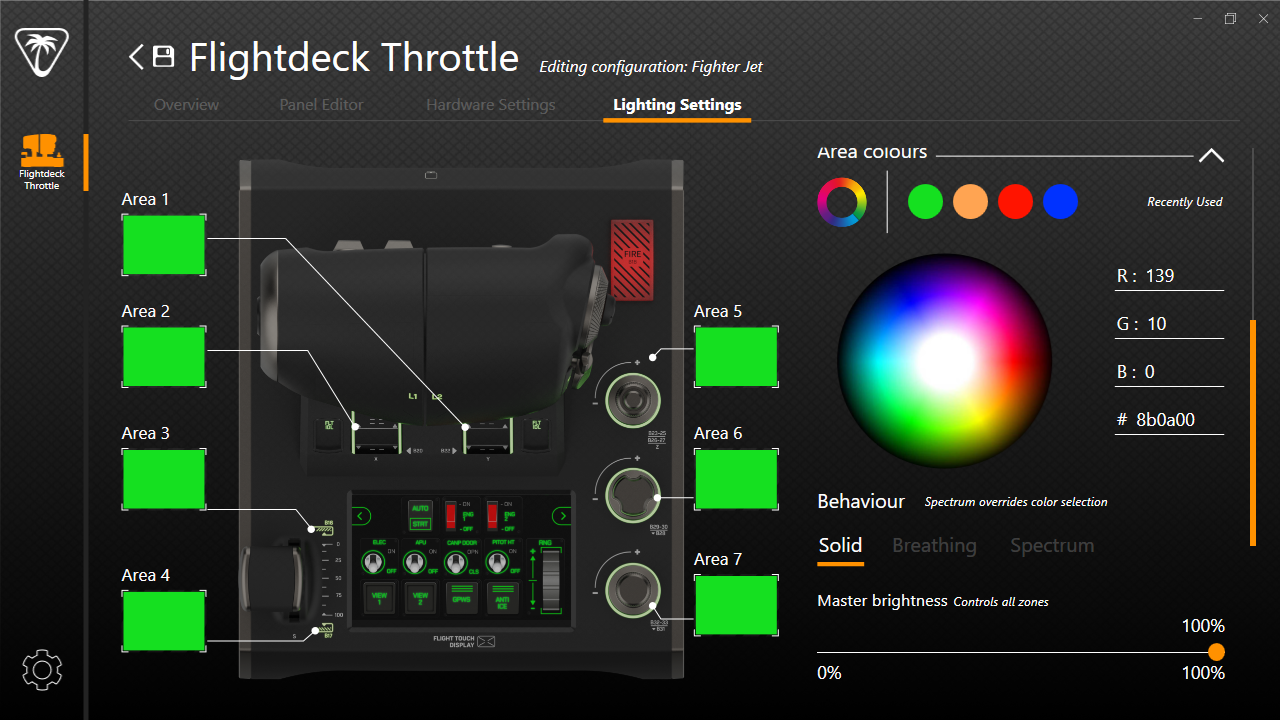
This page enables you to configure the RGB lighting on the throttle module.
You can choose from global color combinations, or customize each individual lighting area. The brightness level is global across all lighting zones, even if the color is customized in each individual lighting area.
To customize your lighting zones, first select the Custom option (in the bottom of the "Global Presets" section).
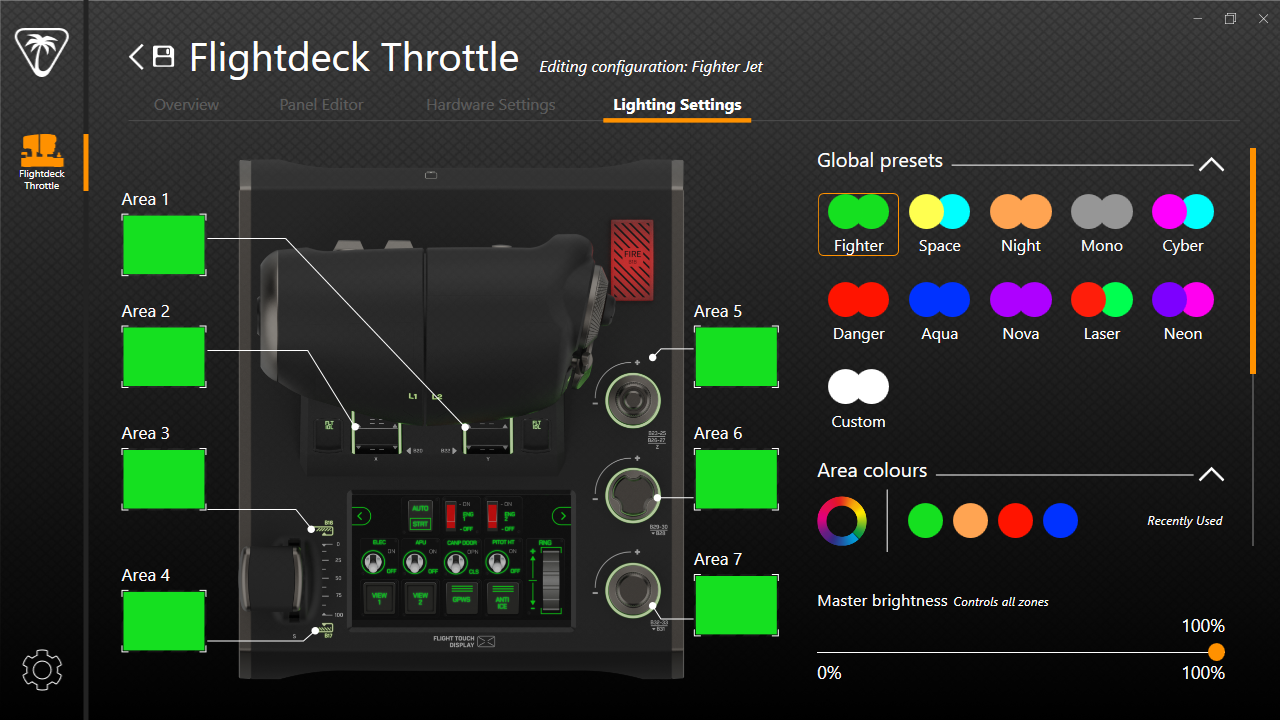
Then, select the area you want to customize, and either choose a color from the swatch on the right-side on the window, or input an RGB figure/value directly. You can also select an effect to be output by the LEDs, in the "Behavior" section just below the Area colors section.