To calibrate your VelocityOne Flightdeck, please do the following.
THROTTLE MODULE CALIBRATION
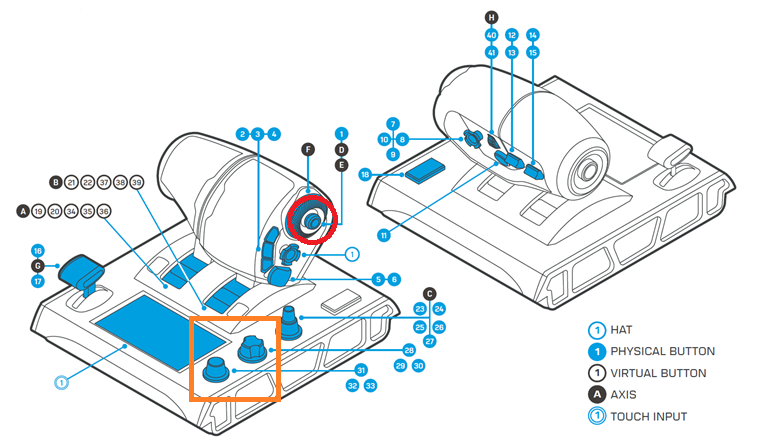
- If the two throttle levers are not already locked together, lock them using the button on the left side of the left lever (highlighted with a red circle in the image above) -- press and hold that button, align the levers in the locked position, and then release that button.
- Press B28 & B31 (the two dials on the bottom right of the Throttle module, highlighted with an orange square in the image above) and hold together for 5 seconds. The ring-of-light under B31 (the lowermost dial on the Throttle module) will flash blue to indicate that the Throttle module has entered calibration mode.
- Move the Large L1/L2 Levers from bottom to top to bottom
- Move the Rx/Ry stick on the right side of L2 through 5 full circles
- Move the small lever on the bottom left up and down twice
- Press B28 & B31 together to exit the calibration mode; again, those buttons are highlighted in an orange square in the image above).
- Open up the Hangar App, select the Throttle module, and select Hardware Test.
- Move the levers and controls on the Throttle module; those controls should register normally.
STICK MODULE CALIBRATION
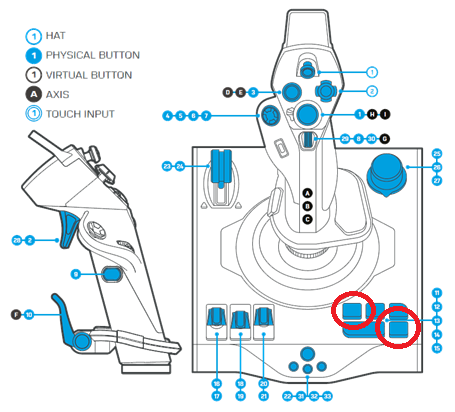
- Press and hold B11 and B15 together for 5 seconds. B11 & B15 will flash blue to indicate calibration mode.
- These buttons are highlighted with red circles in the image above.
- Now begin to move all axis controls on the Stick as follows:
- Stick X and Y Axes – Move the Stick to a maximum deflection point then rotate 3 times, ensuring that you are not pressing to hard at the maximums.
- Stick Twist Z Axis – Twist the stick left and right to the maximum 3 times.
- Rx and Ry Thumbstick Axes – Move the thumbstick to a maximum position then rotate 3 times.
- Rz Pinky Lever Axis – Pull the pinky lever in to maximum and then slowly release 3 times, but do not activate the B10 button click when doing this.
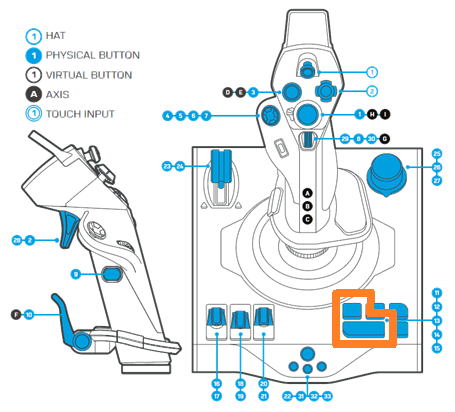
- Press B11 and B14 at the same time to exit calibration.
- These buttons are highlighted in orange in the image above.
- Open up the Hangar App, select the Stick module, and select Hardware Test.
- Move the levers and controls on the Stick module; those controls should register normally.
If you need additional assistance, please
contact our Support team.


